- Published on
How to use a CakePHP API as the data backend for Ember in 30 minutes
In this follow-up post to How to make your CakePHP 3 API produce JSON API we will show you how easy it is to use your CakePHP API as the backend for an Ember application, allowing you to keep benefiting from the extremely powerful CakePHP ORM whilst also enjoying all the frontend-goodies provided by Ember.
The tutorial:
- Provides step-by-step instructions
- Ends with a full CRUD implementation
- Adds background information to help you understand the underlying concepts
CakePHP Users
Even though this tutorial does not touch a single piece of PHP code the learning curve should be minimal since both frameworks share a lot of characteristics:
- Convention over configuration
- A stack of proven tools that "just work"
- Command line tools for baking/generating code
- Rapid Development; getting productive, very fast
- Highly maintainable, painless upgrades
- Suitable for both small and ambitous applications
Before We Begin
This is part six of the CakePHP 3 REST API tutorial series:
- How to build a CakePHP 3 REST API in minutes
- How to use a CakePHP 3 REST API
- How to prefix route a CakePHP 3 REST API
- How to add JWT Authentication to a CakePHP 3 REST API
- How to make your CakePHP 3 API produce JSON API
- How to create an Ember application with (CakePHP) JSON API backend in 30 minutes
Before starting this tutorial make absolutely sure:
- That you have the
cake3api.appAPI up-and-running - That it is producing valid JSON API
- That it is allowing CORS requests
You may create the API by either:
- Completing the previous tutorial
- Starting fresh by using these end-state application sources, composer installing and running the database migration.
Assumptions
This tutorial assumes:
- The hostname serving your Ember application is cakebox (replace with your own system name where applicable)
- The FQDN of your API is
cake3api.app(replace with your own FQDN where applicable) - Chrome with the Ember Inspector add-on as your client browser
1. TLDR just give me the Ember end-state source files
Novice users should skip this step.
git clone https://github.com/bravo-kernel/application-examples
cd application-examples
cd blog-how-to-use-a-cakephp-api-as-the-data-backend-for-ember-in-30-minutes
npm install
ember serve
Browse to http://cakebox:4200
2. Requirements
This tutorial requires the installation of nodejs, ember-cli, phantomjs, and bower on your server.
Since every system will have different requirements you should consider the following instructions (taken from an installation on cakebox using Ubuntu 14.04) as nothing more than an example:
curl -sL https://deb.nodesource.com/setup_6.x | sudo -E bash -
sudo apt-get update
sudo apt-get install nodejs
npm install -g ember-cli
npm install -g phantomjs
npm install -g bower
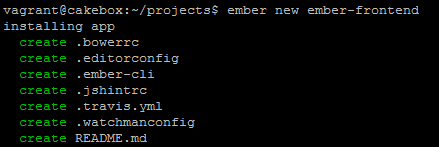
3. Creating the Ember application
Ember comes with the ember CLI command which is similar to CakePHP's cake and used to generate applications, routes, models, etc. We will generate a fresh Ember application named ember-frontend by running:
cd /path/to/your/projects/directory
ember new ember-frontend
cd ember-frontend
4. Meeting Ember
Since this is basically all that is needed to create a new Ember application this might be a good moment to take a quick look at the files and folders to get a quick first impression of the application structure.
To see your Ember application in action run ember serve and browse to http://cakebox:4200:
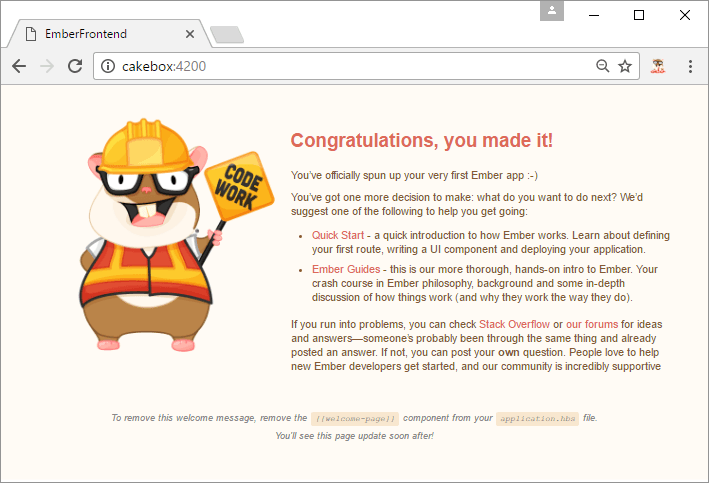
To continue this tutorial without the Tomster mascotte open templates/application.hbs and remove the following line:
{{welcome-page}}
5. Creating the Ember Data Adapter
Ember Data's (now default) JSONAPIAdapter is the awesome/amazing glue responsible for automatically constructing all JSON API calls required to communicate with your API backend. Generate it by running:
ember generate adapter application
Now open app/adapters/application.js and add the connection settings pointing to your API so it looks like this:
import DS from 'ember-data';

export default DS.JSONAPIAdapter.extend({
  host: "http://cake3api.app",
  namespace: "api"
});
Please note that we MUST set the namespace here because we created a CakePHP prefixed route in tutorial #3
6. Creating the Ember models
Ember Data must somehow be made aware of the models/resources available in our CakePHP API (and their relationships) and amazingly enough all that is required for that to happen is generating an "Ember model".
Since our API is serving cocktails we create a corresponding Ember model by running:
ember generate model cocktail
Now open app/models/coctkail.js and specify which attributes you want to be available in the frontend:
import DS from 'ember-data';
import attr from 'ember-data/attr';

export default DS.Model.extend({
  name: attr(),
  description: attr(),
  created: attr(),
});
Do not forget to add ember-data/attr
7. Adding the index route
To start with Ember uses "routes" which are comparable with CakePHP controllers and Handlebars "templates" which are comparable with CakePHP templates. To generate the route we will use to hook into our API's index action we run:
ember generate route cocktails/index
This will:
- Create
app/routes/cocktails/index.js - Create
app/templates/cocktails/index.hbs - Update
app/router.jsto include the newly generated route
Now open app/routes/cocktails/index.js and add our model so all cocktail data is automatically fetched from our API when accessing this route/page.
import Ember from 'ember';

export default Ember.Route.extend({
  model() {
    return this.store.findAll('cocktail');
  },
});
All that is needed now is updating the template so it will show the fetched data so let's update app/templates/cocktails/index.js and make it look like this:
<h2>Ember Data JSONAPIAdapter - Index route</h2>

<table>
  {{#each model as |cocktail|}}
      <tr>
          <td>{{cocktail.id}}</td>
          <td>{{cocktail.name}}</td>
          <td>{{cocktail.description}}</td>
          <td>{{cocktail.created}}</td>
      </tr>
  {{/each}}
</table>
Done, seriously.
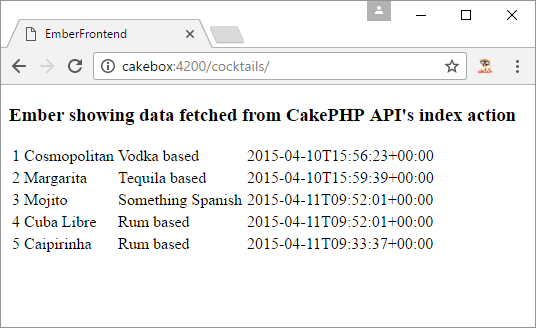
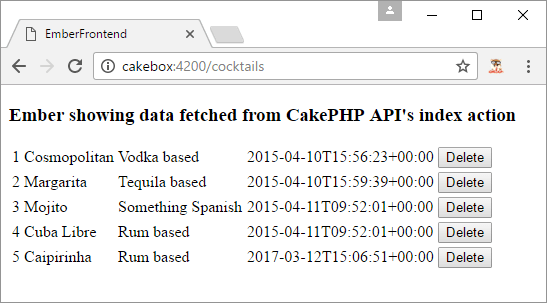
Verify
Now that you have created your first API-driven page verify Ember is actually fetching from your API:
- Open Chrome
- Browse to your Ember application at
cakebox:4200/cocktails - Make sure it displays the records as found in your CakePHP database:
8. Using Ember Inspector
The Ember Inspector in Chrome will help you get a better understanding of the underlying API magic so let's zoom in on that subject before continuing.
Inspecting API Resources
The API resources used by your Ember frontend can be found by:
- Opening chrome
- Pressing F12
- Selecting the
Networktab - Browsing to
cakebox:4200/cocktails
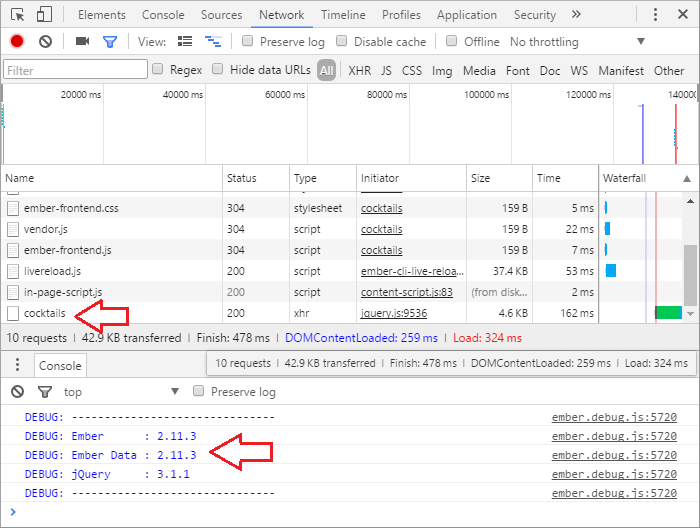
- upper arrow: tells us that a network resource named
cocktailswas fetched using jquery (executed by Ember Data) - lower arrow: tells us Ember Inspector is recognizing the page as valid Ember
Inspecting API Resource Headers
To zoom in on the API resource and inspect the headers simply click cocktails which should give you something like:
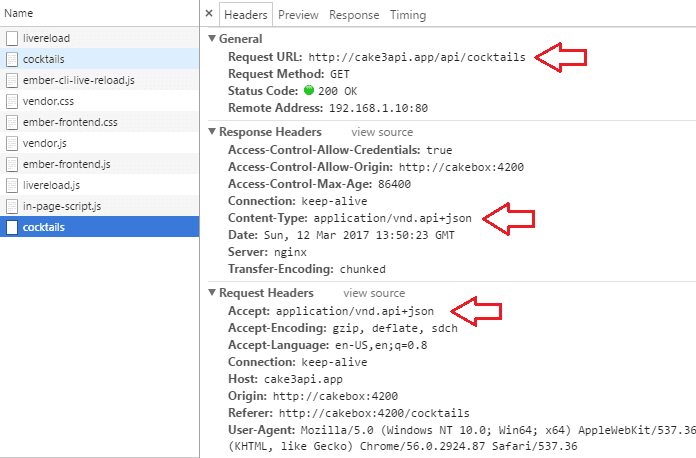
- Upper arrow: proves the resource is fetched from our CakePHP API
- Center arrow: tells us the CakePHP API is responding with JSON API
- Lower arrow: tells us Ember Data is automatically sending the JSON API Accept Header with all requests
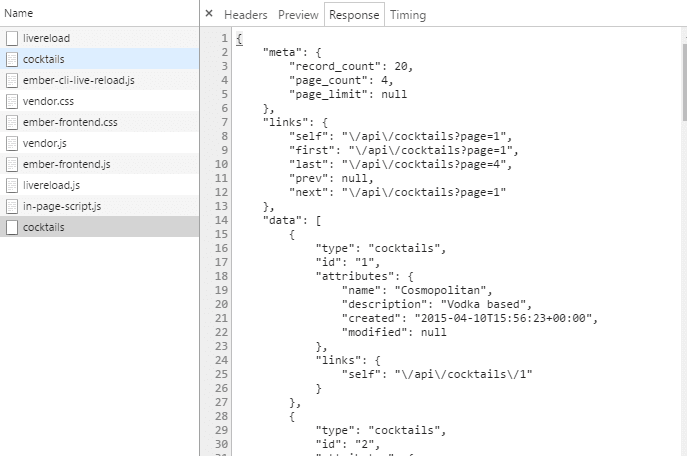
Inspecting the API response
You will be able to see the JSON API response produced by the API by clicking the Response tab. This should look more than familiar since you have implemented JSON API during the previous tutorial (pretty cool).
FYI the Preview tab will show the exact same results but objectied for easy click-through.
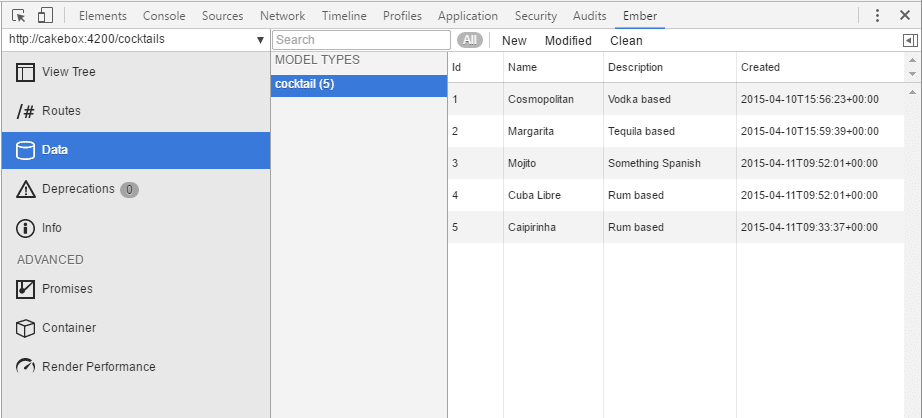
Inspecting Ember Data records
The Ember Inspector is really useful when we want to see how our API data is being used by Ember. To make this more clear:
- Select the
Embertab - Select the
Datacontainer - Select the
cocktailmodel type
You should notice two things:
- The attributes are corresponding to the Ember
cocktailmodel we created earlier - And are thus missing the
modifiedattribute we excluded (even though our API is servicing it)
Inspecting Ember Data record details
Every record contains very detailed information which is revealed when clicking a record.
Relationship information (belongsTo, hasMany) will appear in the Flags section when applicable.

9. Adding the delete action
Ember uses template actions to let users interact with data so let's add one that will automatically construct and send the correct DELETE request to our API.
Moment, since all template actions require a corresponding (named) event in the routes file first open app/routes/cocktails/index.js and update it to look like this:
import Ember from 'ember';

export default Ember.Route.extend({
  model() {
    return this.store.findAll('cocktail');
  },

  actions: {
    deleteCocktail(cocktail) {
      let confirmation = confirm('Are you sure?');

      if (confirmation) {
        cocktail.destroyRecord();
      }
    }
  }
});
Now that the deleteCocktail event/action is in place all that is left to do is updating the index template with a button so users can trigger the action. To do so, open templates/cocktails/index.hbs and update it to look like this:
<h3>Ember showing data fetched from CakePHP API's index action</h3>
<table>
  {{#each model as |cocktail|}}
      <tr>
          <td>{{cocktail.id}}</td>
          <td>{{cocktail.name}}</td>
          <td>{{cocktail.description}}</td>
          <td>{{cocktail.created}}</td>
          <td><button class="button" {{action 'deleteCocktail' cocktail}}>Delete</button></td>
      </tr>
  {{/each}}
</table>
Verify
Verify you are able to delete records in your API by using the Ember page by:
- Opening Chrome
- Pressing F12
- Selecting the
Networktab - Browsing to your Ember application at
cakebox:4200/cocktails - Making sure it now displays
Deletebuttons - Pressing one of the
Deletebuttons (and confirming the delete)
If things went well:
- Ember automagically made two requests to your API (see the Chrome
Networktab):- One for the CORS
OPTIONS - One for the actual
DELETE
- One for the CORS
- Clicking those requests should now produce information that makes sense to you
- The record was deleted from your CakePHP database
- Refreshing the page should no longer show the deleted record
- You should by now be quite impressed with how easy that actually was

10. Adding the add action
Without going into details we will create an Ember nested route to create a dedicated page for our add action by running:
ember generate route cocktails/add
This will:
- Create
app/routes/cocktails/add.js - Create
app/templates/cocktails/add.hbs - Add the nested route to
router/router.js
Similar to the delete action we will first create a named event so update app/routes/cocktails/add.js to look like this:
import Ember from 'ember';

export default Ember.Route.extend({
  model() {
    return this.store.createRecord('cocktail');
  },

  actions: {
    addCocktail(cocktail) {
      let confirmation = confirm('Are you sure?');

      if (confirmation) {
        cocktail.save();
      }
    }
  }

});
Open app/templates/cocktails/add.hbs and add this basic form the user will use to trigger the addCocktail action:
<h3>New Cocktail:</h3>
<form>
  <label>Name: {{input value=model.name}} </label>
  <label>Description: {{input value=model.description}} </label>
  <button class="button" {{action 'addCocktail' model}}>Add</button>
</form>
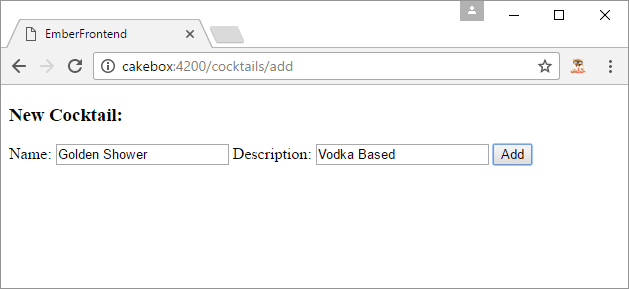
Verify
Verify you can add a new record to your CakePHP database using your Ember frontend by:
- Browsing to
cakebox:4200/cocktails/add - Making sure the input fields are there
- Filling the form fields
nameanddescription - Pressing the
Addbutton
If things went well:
- Ember automagically made two requests to your API (see the Chrome
Networktab):- One for the CORS
OPTIONS - One for the actual
POSTrequest
- One for the CORS
- You should be able to see the new record in your CakePHP database
11. Adding the view/edit actions
Almost there.
ember generate route cocktails/edit
Update app/routes/cocktails/edit.js so it looks like this:
import Ember from 'ember';

export default Ember.Route.extend({
  model(params) {
    return this.get('store').findRecord('cocktail', params.id);
  },

  actions: {
    saveCocktail(country) {
      let confirmation = confirm('Are you sure?');

      if (confirmation) {
        country.save();
      }
    }
  }
});
To handle the id parameter open app/router.js and replace this.route('edit'); with:
this.route('edit', { path: "/edit/:id" });
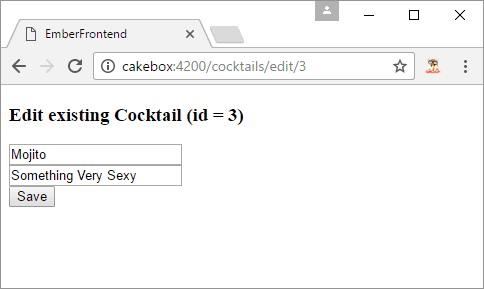
Update app/templates/cocktails/edit.hbs so it looks like this:
<h3>Edit existing Cocktail (id = {{model.id}})</h3>
<form>
    <div>{{input value=model.name}}</div>
    <div>{{input value=model.description}}</div>
</form>

<button class="button alert small" {{action 'saveCocktail' model}}>Save</button>
All done, browse to http://cakebox:4200/cocktails/edit/3 and verify that you can view, edit and save the record.
Bonus: Relational Data
For simplicity's sake we did not touch the subject in this tutorial but... Ember Data will also (automatically) detect and handle your API's belongsTo and hasMany relationships as can seen in the following screenshot:
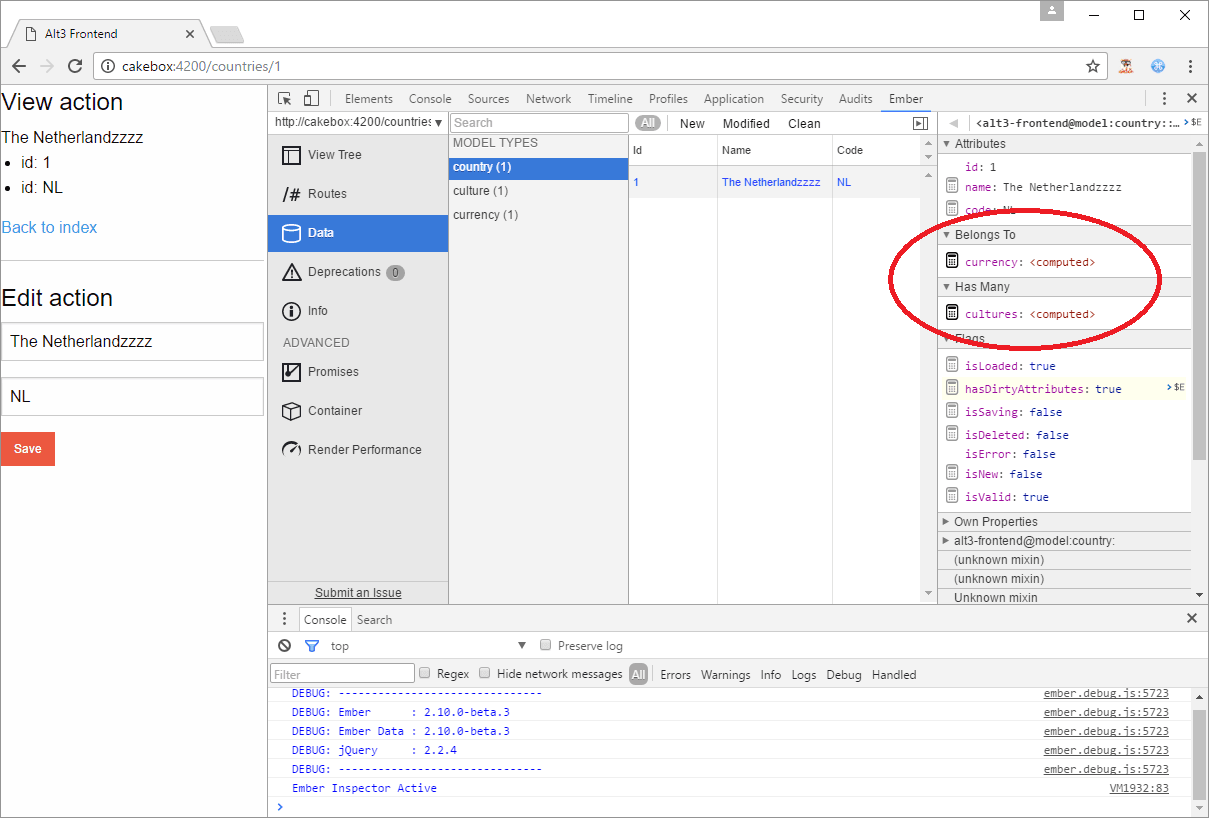
Please consult the Ember documentation for more information but enabling the above relationships was as easy as adding them to the Ember model like this:
export default DS.Model.extend({
  name: attr(),
  code: attr(),
  native: attr(),
  currency: belongsTo('currency'),
  cultures: hasMany('culture')
});
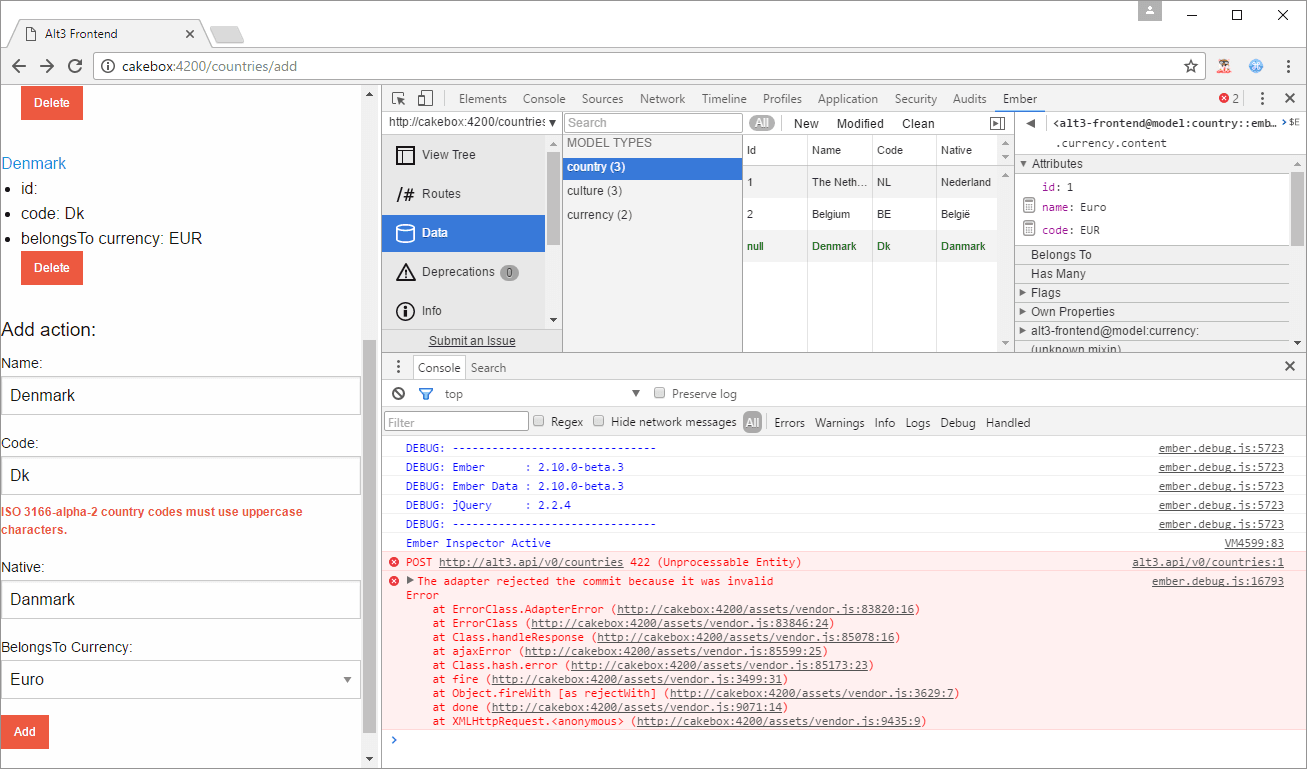
Bonus: Validation Errors
Because your CakePHP API is producing JSON API compatible (validation) errors... those are handled by Ember Data automatically as well, making them instantly availble in your frontend as can be seen in the screenshot below where:
- Your API is returning the 422 validation error along with validation error messages
- Ember Data picks up the validation messages and makes them avaible for display on the page
Getting help
Both CakePHP and Ember have very friendly online communities that are more than willing to help you out if you encounter any problems so make sure to join:
- the CakePHP Slack group or their #cakephp IRC channel
- the Ember Slack group or their #emberjs IRC channel
Additional reading
Eternal hat-tip to Phally for inspiring (and actually prototyping) this many years ago.